Brughel research:
My Meeting with Brughel the Elder
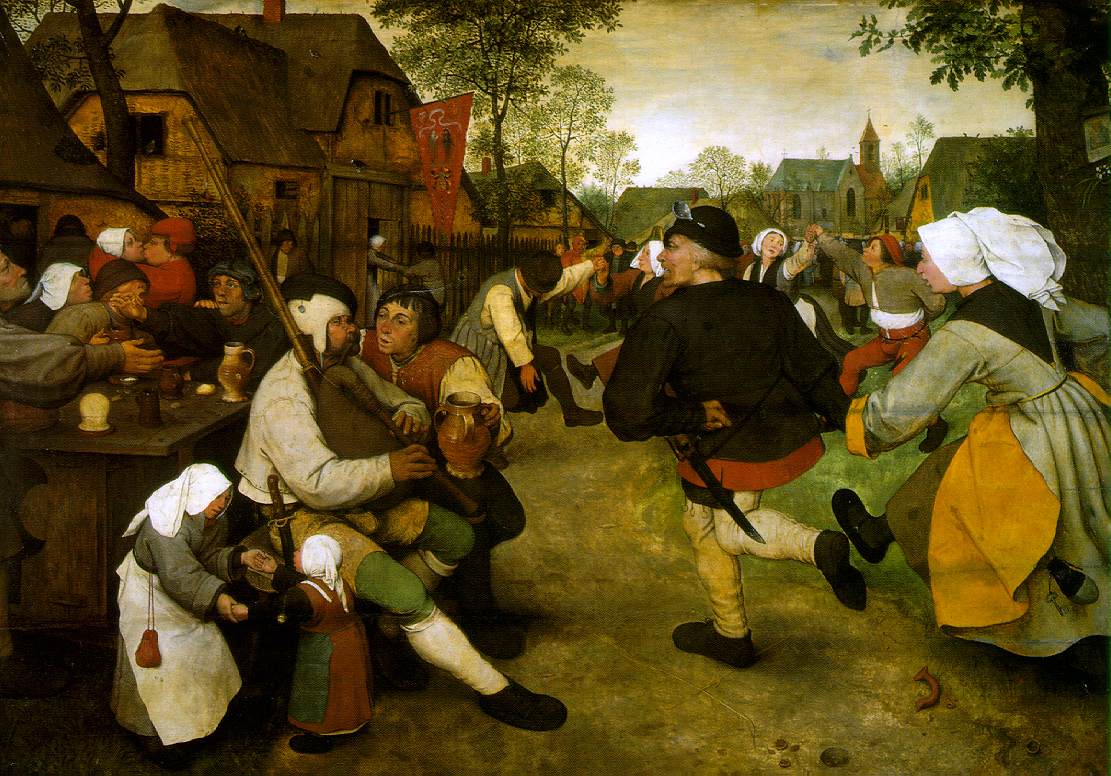
Recently I began recreating the
dress from Brughel the Elder’s “Peasant Dance” shown here:
I am working on the dress to the far right.
A very similar dress is found on
another of his paintings, here:

being this time shown without the black partlet.
Of immediate interest to a costumer are the strange seams running diagonally down the back of both dresses, which seams are also shown on most of Brughel’s women. However, what apparently had not been shown (at least to my knowledge) is the pattern for the dress that creates these seams and why they are included. This is the question that I have tried to answer in my study. I believe that I have a good working hypothesis, and perhaps, a partial answer to that question. I will try to show my hypothesis with this paper.
1. Research
I began my research by searching for all Brughel the Elder paintings that I could find online and in art books. I looked for paintings that would give more definition to the pattern of the Peasant Dress, but unfortunately, I had no luck. Mr. Brughel, it would seem, loves to paint his women from the back or at a distance. I could get no clear shot of the front or the side of a female’s attire.
2. Fabric
I have made the assumption, by looking at the paintings, that the dress is made of linen, with linen lining, and a wool partlet. There is no evidence for this, however, these are period fabrics and would have been easily accessible to a peasant. Furthermore, I felt that a fully lined wool outfit would have been out of the question for a re-enactor in Kansas, where our summer temperatures have exceeded 110 degrees farenhight.
Due to monetary concerns for this project I chose a 50% linen, 50% cotton fabric for the outside of the dress and the skirt, and a cotton broadcloth for the lining of the dress.
3. Warring Passions
Those of you out there who research and recreate outfits from the renaissance timeline and also attend renaissance festivals for fun will be with me here. I have been looking at this painting, and other Brughel's, and daydreaming of recreating it for over a year. One of the things that attracted me at first to it was that it seemed to break all of the “rennie” rules of costuming that you will hear at a renaissance festival. The sleeves were sewn in and cut straight, not poofy; the front of the dress was probably pinned or hook and eye closed, not laced with Dritz grommets; and a peasant was wearing black, sure not a lot, but it is there. These so-called rules have frustrated me from the beginning of my days as a costumer. At first, because I believed them, but later because they don’t make any sense whatsoever.
I had put off starting the project because I wanted so desperately to understand the pattern. Where did those infernal lines come from? Why are they there? Is the front of the dress laced or pinned? Does anyone know for sure?
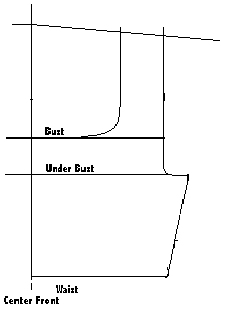
Well, eventually time caught up with me. Either I had to just “do it” and make the dress with the lines, without understanding the pattern, or I had to go to faire in the buff. I am sure that no one wanted to see that. So I began drafting out the bodice like I always do. I took my measurements and drew out my shape and then began to draw the bodice around it. I had decided to make a more typical Flemish dress and not really worry about it being exactly like the dress, and so the pattern that I was working on looked something like this:
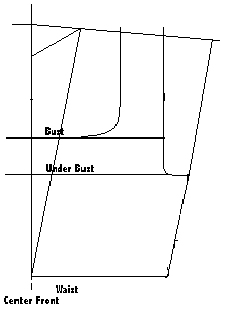
And I am explaining the problem to my Fiancée as I am drawing. I don’t understand how they did it. And as I work, I am drawing the bodice around my body. To make a long story short, I realized that the front diagonal line that I wanted to create for the lacing was exactly parallel with my side waist-to-bust line. In fact, if I extended the waist-to-bust line up to the shoulder line, it met on the outside of my shoulder, and if I extended the theoretical line of the front lacing edge of the bodice, it matched where my shoulder met my neck! And the shape that was left was the odd triangle from the back!
I believe I said something like “By Jove, it just might work” and so I began to draw it all the way out as if it were on 20” fabric. All the while I am doing this, I am explaining it to my Fiancée, who is sitting next to me with a silly “Fabric? What’s Fabric?” look on his face, but he is encouraging me. Well, the pattern as it sits on my body looks like this:
Well, I took that idea and ran with it, exclaiming in joy “I may just end up figuring this damn thing out after all!”
4. Drafting the pattern and making it work.
This was actually easier than it might sound. In fact, it was sickeningly easy, and if my hypothesis that this is the pattern is correct, it could partially explain why it was used. An ordinary generic Elizabethan bodice takes me about one hour to draft out, starting with taking the measurements.
This took me ten minutes and required almost no measurements or geometry.
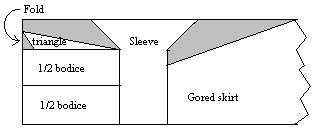
I took my measurement from belly button to where the shoulder and neck meet. I took my waist measurement; I took my neck measurement. I took my shoulder to arm measurement. That’s it. I then drew out a rectangle with the long side as the BB-Sh measurement, and the short side as 1/4W. I then drew out a triangle, right next to the rectangle, that had one side the length of the BB-Sh measurement, the top as 1/4N and then met at the bottom. I also drew out the sleeves, making sure that they were square and gored. The resulting pattern and layout on 22” fabric would look as so:
5. Potential problems that this pattern solves
The first thought of an experienced costumer might be that if the bodice were cut in squares, the shoulder would stick up funny. However, I found that this is not so. Pulling the middle of the rectangles to meet causes the side of the shoulder to come down. It also pulls the waistline up. Hold a piece of paper straight up and down, and then pull the top-left corner to the right, like it would go for a neck, and you will see what I mean. This pattern also results in a very small amount of lost or wasted fabric.
This pattern also corrects for there being limited bust room as the gores in the sleeve help to give room for the breasts.
6. Problems that this pattern creates
The problems that I encountered with this pattern are actually quite few. It sewed together beautifully and quickly. I had the lining drawn, cut, and sewn together in approximately one hour. (Please note that I anticipated and drew out the layout of the pattern on 22” fabric, but I used 45” for the lining and 60” for the outer dress and skirt. This made for much more wasted fabric than I would have had if I had cut it in half and laid it out as shown.)
The gown fits quite nicely and is much more mobile than any Elizabethan bodice that I have encountered. Due to the way the fabric folds over the breasts to the armholes, there is no rubbing like that I have encountered with other bodices.
On the “Peasant Dance” dress, there is a horizontal seam in the center of the back that had not been explained. However, after making this dress, I have a working theory as to the cause of that seam. If you go back to my previous example of the piece of paper, and you do this again, you will see the strange bunching that this creates. On the front of the dress, this is fine. Women have breasts, and that bunch makes the dress fit nicely over them. However, on the back, this is quite unsightly. I am hypothesizing that an inexperienced tailor, such as myself, may have done the exact same thing as I, and decided to tuck up that extra fabric in a dart. Perhaps not, as there is not any evidence in the painting of a bunch or gather in the back of the sleeve. But this is an idea as a place to begin. The individual may even have done the correction before attaching the sleeve, which would explain the lack of bunching.
7. In conclusion
I believe that I have a good and defendable working hypothesis of the pattern of the dress in Brughel’s “Peasant Dance.” The next step for me will be checking this pattern on a variety of body types, and working out the bunching in the back, as not all of Brughel’s dresses show this horizontal line. I believe that if I take the back rectangles, and cut the waistline at a slight angle, perhaps up 1” or so, it will eliminate this bunching. Until I do further tests, I cannot be certain that this is how the dress was accomplished. For now, I think this is perhaps the best guess that we have.